Adding text and graphics to a report
To add text and graphics to a report, you drop text and image fields onto report lines in the body of the report shell.
Adding a text field
Add a text field to your report as follows:
1. Select  , the Report Text Field, from the parts palette.
 , the Report Text Field, from the parts palette.
 2. Place the mouse pointer on the report line in the body of the report and click button 1.
3. To size the text field to the width of the report line, select the field and then grab the resize handles and drag them until the field fills the report line.

You can resize text fields horizontally only
4. To edit the text in the field, place the pointer over the field, hold the Alt key, and click button 1. Type the following text into the field:
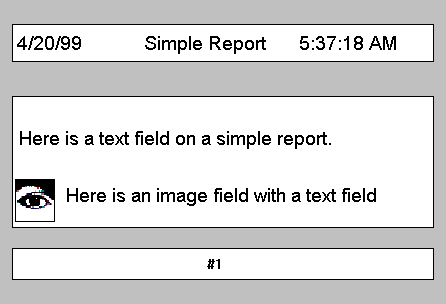
Here is a text field on a simple report.

You can also edit the text of the field in its properties table. Select the object field. Type the text you want, then close the Properties window.
Adding graphics
Add graphics to your report as follows:
1. To add another report line to the body, select  , the Report Line, from the parts palette, and drop this part below the first line.
 , the Report Line, from the parts palette, and drop this part below the first line.
The mouse pointer will change to crosshairs when it is positioned over a spot where you can drop the line.
2. Select  , the Report Image Field, from the parts palette.
 , the Report Image Field, from the parts palette.
 3. Drop the image field onto the new line.
This field appears as a gray box. The default size for an image field is 1 inch square. You can resize image fields both horizontally and vertically. When you resize the image field, the report line grows vertically to accommodate the height of the field.
4. Open the settings of the report image field and select the graphicsDescriptor field, then open the Graphics Descriptor window.
5. To add an image to your report, change the settings as follows:
a. Select the Image radio button.
b. Type in the file path name of a bitmap file. You can use the Browse button to help you locate a file.
Once you have selected a file, the image appears in the Preview frame. If you type the file name, the image will appear in the Preview frame as soon as a valid path has been typed.
6. To scale the image to the size of your image field, change the sizeEfects property to Size image to field.
7. Now add another text field to the same line and enter the following text:
Here is an image field with a text field beside it. This text can wrap to the next line.
8. Size this text field to the remaining width of the line.
9. To set the text wrapping option for the text field, in the Properties window, select Wrap from the sizeEffects drop-down list.
In the Composition Editor, this text will appear to be clipped, but when you test the report, the text will be wrapped to the next line.

Your report is ready to be tested, previewed, and printed.
Last modified date: 05/18/2020