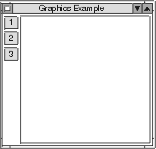
Example code to create a widget tree
The following code illustrates how to create the example widget tree shown above:
| shell main form drawArea rowColumn button1 button2 button3 |
shell := CwTopLevelShell
createApplicationShell: 'shell'
argBlock: [:w | w title: 'Graphics Example'].
"A top-level shell is created. A mainWindow widget is created. The parent is shell."
main := shell
createMainWindow: 'main'
argBlock: nil.
main manageChild.
"A form widget is created as a child of main."
form := main
createForm: 'form'
argBlock: nil.
form manageChild.
"A drawArea widget is created as a child of form."
drawArea := form
createDrawingArea: 'drawing'
argBlock: [:w |
w
"Its width and height are set to 300 pixels."
width: 300;
height: 300;
"Its border width is set to 1 pixel."
borderWidth: 1].
drawArea manageChild.
"A rowColumn widget is created as a child of form."
rowColumn := form
createRowColumn: 'buttons'
argBlock: nil.
rowColumn manageChild.
"In addition, three push buttons are created as children of rowColumn.
By default, the names of the buttons ('1', '2', '3')
will appear as the button labels. rowColumn will
determine its size based on the sizes of the buttons."
button1 := rowColumn
createPushButton: '1'
argBlock: nil.
button1 manageChild.
button2 := rowColumn
createPushButton: '2'
argBlock: nil.
button2 manageChild.
button3 := rowColumn
createPushButton: '3'
argBlock: nil.
button3 manageChild.
"Form constraints for each child widget within form are specified.
rowColumn is offset from the edge of form by 2 pixels on all sides,
and attached to the edge of form on the top, bottom, and left sides."
rowColumn
setValuesBlock: [:w |
w
topAttachment: XmATTACHFORM;
topOffset: 2;
bottomAttachment: XmATTACHFORM;
bottomOffset: 2;
leftAttachment: XmATTACHFORM;
leftOffset: 2].
"drawArea is attached to form on the top, bottom and right. On the left side,
it is attached to rowColumn."
drawArea
setValuesBlock: [:w |
w
bottomAttachment: XmATTACHFORM;
bottomOffset: 4;
topAttachment: XmATTACHFORM;
topOffset: 2;
rightAttachment: XmATTACHFORM;
rightOffset: 4;
leftAttachment: XmATTACHWIDGET;
leftWidget: rowColumn;
leftOffset: 2].
"Finally, the realizeWidget message is sent to the topmost widget.
All widgets are now shown on the screen."
shell realizeWidget
Tip:
Form constraints are described in detail in Form widgets.
When this code is run, a window titled "Graphics Example" appears on the screen. The widgets behave as expected, but the application is not notified when a button is pressed or when the mouse is moved. For the application to be notified of the user's interaction with the widgets, event handlers and callbacks are required.

Last modified date: 12/22/2017