Step 9: Add a script


For AlarmClockView to display a message box at a specific time, it needs a script that does the following:
•Gets the values in the Hour and Minute spin buttons
•Calculates the time for displaying the message box
•Delays the display of the message box until the specified time
•Displays the message box
To add the script:
1. Click on the  icon in the lower-right of a Composition Editor open on AlarmClockView. A Script Editor opens.
 icon in the lower-right of a Composition Editor open on AlarmClockView. A Script Editor opens.
 2. In the Script Editor, select Add from the Categories menu.
3. In the displayed prompter, type a name that will help you identify the script you're adding, such as Alarm Clock example, and select OK.
4. Click on  , the New Method Template icon in the upper-left of the editor. The following template appears in the lower pane:
messagePattern
"comment"
| temporaries |
statements
messagePattern
"comment"
| temporaries |
statements
5. Replace the template with the following code:
messageDelay
"Delay the message prompter. Subtract the present
time from the user's alarm-time (alarm) to get the
number of seconds to delay the Message prompt."
| h m alarm seconds |
h := ((self subpartNamed: 'Hour') entryString) asNumber * 3600.
m := ((self subpartNamed: 'Minute') entryString) asNumber * 60.
alarm := h + m.
seconds := alarm - (Time now asSeconds).
seconds < 0
ifTrue: seconds := seconds + 86400].
(Delay forSeconds: seconds) wait.
(self subpartNamed: 'Message Prompter1') prompt] fork.
6. On Windows click mouse button 2 on the lower pane. On UNIX platforms, click mouse button 3 on the lower pane. Then, select Save from the displayed pop-up menu. The name of the script, messageDelay, appears in the upper-right pane.
If Undefined or a similar phrase is shown, ensure that you've typed in the code given above.
You can copy code from this help to the clipboard by selecting Copy from the Edit menu of the browser window. Then paste it into the Script Editor by selecting Paste from the pop-up menu of the lower pane. (After you delete all text except for the script, pop up the menu and select Save.)
Changing the part names in the script
If you've not renamed the user-interface parts, you'll have to change the (self subpartNamed: '<part name>') <attribute or action> statements in the script. To change, for example, the one following h := :
1. Place your mouse cursor after the h := and click once.
2. Click on the  icon.
icon.
 icon.
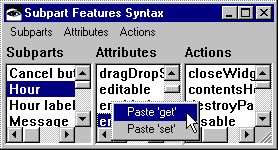
icon. 3. In the displayed Subpart Features Syntax tool, select whatever name you have for the Hour Data Entrypart in the Subparts pane and entryString in the Attributes pane.
4. Using mouse button 2, click on the Attributes pane. (For UNIX, use mouse button 3.)
5. Select Paste 'get' from the pop-up menu.


6. Change the statement for h := so it displays:
h := ((self subpartNamed: '<name>') entryString) asNumber * 3600.
<name> should have whatever name is given for the Hour Data Entry part.
If you need to change the part names for the Minute Data Entrypart (statement following m :=) or the Message Prompter1 part (last line), you might check the Subparts pane of the Subpart Features Syntax tool to see what you named the parts. Then replace Minute and Message Prompter1 with your names for the parts. Save any changes that you make.
Click on the  icon to switch back to the Composition Editor.
 icon to switch back to the Composition Editor.
 Last modified date: 08/09/2019