Example: Use a form


"Example: Add a form and actions" shows how to make a reusable form that has the actions setName: and setAddress:. This example shows how to use the form to display a given name and address.
Adding a form to your application
Begin by adding the form to a window:
1. Create a new visual part and open a Composition Editor on it.
2. From the Options menu, select Add Part.
3. In Class name field of the Add Part window, type the name of the class that defines the form, and select OK.
4. Click on the window in the Composition Editor.
Adding the rest of the parts
Next, add the following parts:
•1 Group Box  in
in  category
 in
in  category
•2 Push Buttons  in
in  category
 in
in  category
 •2 Text Prompters  in
in  category
 category
Changing the parts' settings
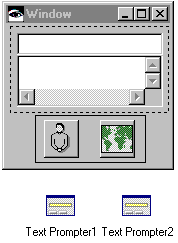
Now, change the parts' settings so your work in the Composition Editor resembles the following:


For the group box settings, set the hoverHelpEnabled property to true. This adds hover help for the push buttons.
For one of the push buttons, change its name to Name. Also, change its label to Name or, in the push button's settings, specify a graphic for the label. The icon of a man shown above is in the ABTICO50 module at ID 543. To specify the icon:
1. Open the settings for the push button.
2. Select the graphicsDescriptor field and open it's dialog.
a. Select Icon for Graphic type, and specify ABTICO50 for the Module name and 543 for the ID. (For UNIX, use I0000543.ico in abtico50.)
b. Select OK.
3. For the labelType property, select XmICON.
For the other push button, change its name to Address and change its label. The icon of the world shown above is in the ABTICO50 module at ID 283. (For UNIX, it's I0000283.ico in abtico50.)
For one of the text prompters, specify in its settings: Name for the title and Type a name: for the message.
Similarly, for the other text prompter, specify Address for the title and Type the person's address: for the message.
Connecting to the form's public interface
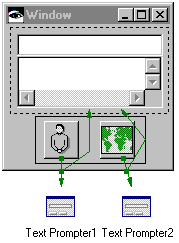
•Connect the clicked event of the Name push button to the prompt action of the Name text prompter.
•Connect the normalResult attribute of the clicked-prompt connection for Name to the form's setName: action.
•Connect the clicked event of the Address push button to the prompt action of the Address text prompter.
•Connect the normalResult attribute of the clicked-prompt connection for Address to the form's setAddress: action.
After you make the connections, the Composition Editor resembles the following:


When you run the application, notice how the hover help displays the names you gave for the push buttons.
Last modified date: 03/28/2020