Example: Wrapper an input window


This example shows how to wrapper a view that prompts users to specify a customer name, then use the wrappered view in another view that displays the specified name.
Making the part to be wrappered
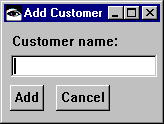
Begin by creating an application, adding a visual part to it, and opening a Composition Editor on the visual part. Then, in the Composition Editor, make the following user interface:


So other parts can use the data entered into the text field, add scripts that provide a public interface for the text field:
1. Select  in the lower-right corner of the Composition Editor to open a Public Interface Editor for the visual part.
 in the lower-right corner of the Composition Editor to open a Public Interface Editor for the visual part.
 2. In the Attribute tab, type the following into the Attribute name field:
customerName
3. Select the Add with defaults button.
4. From the File pull-down menu, select Generate Default Scripts.
5. In the window that opens, select Generate All.
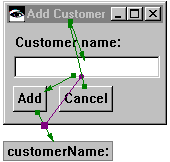
Next, return to the Composition Editor and add the following connections:
•Connect the openedWidget event of the window to the setFocus action of the text field.
•Connect the clicked event for the Add push button to the customerName: script.
•Connect the object attribute for the Text part to the parameter1 attribute for the clicked-customerName: connection.
•Connect the clicked event for the Cancel push button to the closeWidget action of the window.
•Connect the defaultActionRequested event of the text field to the click action of the Acc button. This enables the user to add the name by pressing Enter after typing the name.
After you make the connections, the Composition Editor shows the following:


Finally, save the part.
Making the part that uses a view wrapper
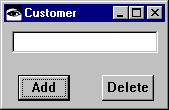
Now make the part that uses the part you just made. Begin by adding a new visual part to your application, and opening a Composition Editor on it. Then, in the Composition Editor, make the following user interface:


Next, select  (Models category) and
  (View Wrapper part), then click on the free-form surface. Open the settings for the part and specify the following in the partName field:
 (Models category) and
  (View Wrapper part), then click on the free-form surface. Open the settings for the part and specify the following in the partName field:
 Add customer
Then set the viewPartClass field to the name which you gave the part to be wrappered.
Adding the remaining connections
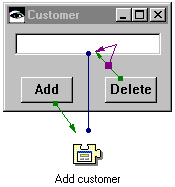
So the part you've just made can use the wrappered part, add the following connections:
•Connect the clicked event of the Add push button to the openWidget action of the Add customer view wrapper.
•Connect the customerName attribute of the view wrapper to the string attribute of the Text part in the Customer window.
Also add two connections that enable users to delete the contents of the text field in the Customer window:
•Connect the clicked event of the Delete push button to the object action of the Text part in the Customer window.
•Connect the value event of the clicked-object connection to the remove action of the Text part.
The Composition Editor now displays the following:


Test and save your work.
Last modified date: 08/14/2019