Nesting SELECT statements
You can nest SELECT statements in the WHERE or HAVING clause of other SELECT statements.
In this example, you will use the SQL Editor to create the following query:
SELECT STAFF.NAME, STAFF.JOB, STAFF.DEPT, STAFF.SALARY
FROM STAFF
GROUP BY STAFF.DEPT, STAFF.JOB, STAFF.SALARY, STAFF.NAME
HAVING (STAFF.SALARY >
(SELECT AVG(STAFF.SALARY)
FROM STAFF))
Query part
1. Begin by creating a new visual part with a multi-row query part.
2. Open the settings of the multi-row query part, create a new SELECT statement, and select the STAFF table from the Tables/views list.
3. Select STAFF.NAME, STAFF.JOB, STAFF.DEPT, and STAFF.SALARY from the Columns list.
Using the GROUP BY Details window
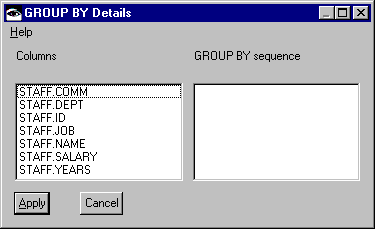
Now you are ready to specify the grouping of the result table rows using a GROUP BY clause.
1. Select GROUP BY from the Clause menu.
This displays the GROUP BY Details window, as shown in the following illustration. Use this window to specify how you want to group the rows of the result table.


2. Select STAFF.DEPT, STAFF.JOB, STAFF.SALARY, and STAFF.NAME in the Columns list. As you select each column, it is added to the GROUP BY sequence list in the order it is selected.

If you need to change the grouping precedence, use the Move after and Move before options on the GROUP BY sequence list's pop-up menu.
3. In this example, the rows that are returned in the result table are grouped first by department, meaning that all rows with the same department number are shown together. Within each department number group, the rows are further grouped by job type, then by salary, then by name.
4. Select Apply to save the GROUP BY clause and return to the SELECT Details window.
Using the HAVING Details window
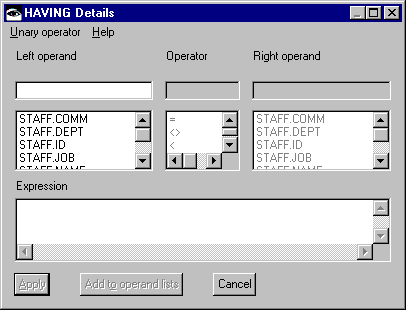
Now you are ready to specify the nested SELECT statement using a HAVING clause.
1. Select HAVING from the Clause menu.
This displays the HAVING Details window, as shown in the following illustration. Use this window to specify how you want to restrict the groups of rows of the intermediate result table.


2. Select STAFF.SALARY in the Left operand list.
3. Select > in the Operator list.
4. Select Right operand > Nested SELECT > ( ) from the Unary operator menu. This displays the Select a query window, on which you have the option to select an existing query or create a new query.
5. Select Create to create a new query. A new SELECT Details window is displayed for you to specify the nested SELECT statement:
SELECT AVG(STAFF.SALARY)
FROM STAFF
6. Select the STAFF table from the Tables/views list.
In the next section you will learn how to add a computed column to this query.
Working with computed columns
Because the column in the SELECT clause is a computed column, you must first create it.
1. To create a computed column, select Create from the pop-up menu on the Computed columns list. The Computed Column Details window is displayed. (It looks like the HAVING Details window.)
2. Select STAFF.SALARY in the Left operand list, Left operand > AVG(x) from the Unary operator menu, and Apply to save your computed column and return to the SELECT Details window.
Any computed columns you create are displayed in the Computed columns list and can be included in the Column sequence list or the SELECT clause of your query.
Also notice that you can edit and delete existing computed columns using the pop-up menu on the Computed columns list.
3. Select AVG(STAFF.SALARY) in the Computed columns list.
4. Name and save your nested SELECT statement.
When you return to the Select a query window, your newly created query is selected.
5. Select OK to return to the HAVING Details window and nest the SELECT statement.
In this sample statement, the groups of rows in the result table are restricted to those with a salary greater than the average salary of all STAFF table entries.
6. Select Apply to save your HAVING clause and return to the SELECT Details window. If you want, name and save your query.

If you are using DB2 V2.1, ODBC, or ORACLE support, then the Computed Column Details window can have one extra field. Some databases support named computed columns. If you enter a name for a computed column, then the computed column appears on the Computed columns field under this name. Computed column names cannot have spaces in them.
Last modified date: 05/20/2020