Displaying a result column
In this example, you will display all the values from one column of the result table in a drop-down list. By changing the selected item in the drop-down list, you will change the current row index of the result table.
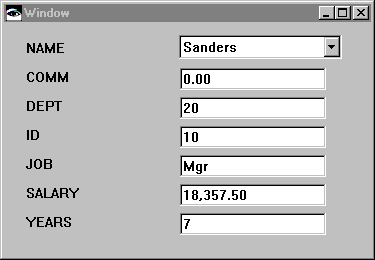
When you have finished, you will have a window that looks like this:


User Interface
1. Begin by creating a new visual part and adding a multi-row query to the free-form surface.
2. Create the following SQL statement.
SELECT STAFF.NAME, STAFF.COMM, STAFF.DEPT, STAFF.ID,
STAFF.JOB, STAFF.SALARY, STAFF.YEARS
FROM STAFF
3. Use the pop-up menu in the Column sequence list of the SELECT Details window to order the columns in the result table in the same order as shown in the SQL statement.
4. Tear off the resultTable attribute from the query part, and then tear off the currentRow attribute from the result table.
5. Create a quick form of the current row's self attribute.
6. Rearrange the fields and labels to appear in the order shown in the illustration.
So far, you have a simple user interface that displays one row of the result table. Since there is no way to navigate through the rows of the result table, change the user interface to add this capability.
Adding navigation
1. Delete the text-entry field that displays the NAME column. In its place, add a drop-down list part.
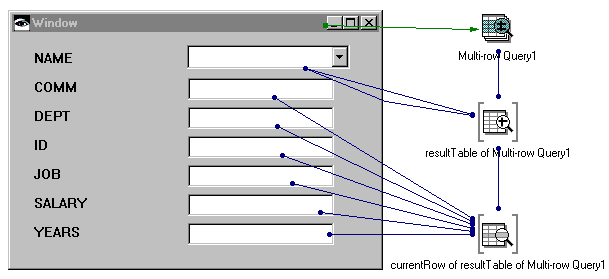
2. Connect the rows attribute of the result table to the items attribute of the drop-down list.
3. Open the settings for the drop-down list and enter NAME in the Attribute to display field. This tells VA Smalltalk that instead of displaying all of the result data, you only want to display the NAME column in the drop-down list.
Note:
Be sure to type the column name into the Attribute to display field exactly as it appears in the part's attribute list.
4. Connect the drop-down list's selectionIndex attribute to the result table's currentRowIndex attribute. Now, when you select a different item in the drop-down list, the current row will change, and the other fields in the window will be updated.
5. Finish your connections by connecting the window's openedWidget event to the multi-row query's executeQuery action.
Your connections should look like the following:


Test your view, and try selecting different items in the drop-down list. You should see that the other fields in the window are updated as you select different staff names.
Adding a warning about unsaved changes
When the user closes a window like the one in this example, it's a good idea to display a warning message about saving changes.


You can do this by adding a message prompter to your visual part as follows:
1. Select  , the Message Prompter part.
2. In the settings view of the message prompter part, set the following attributes:
buttonType
XmYESNO
iconType
XmICONWARNING
messageString
Would you like to save changes to the table before closing this window?
title
Save Changes?
3. Make the following connections:
a. The window part's aboutToCloseWidget event to the message prompter's prompt action
b. The message prompter's okYesRetry event to the result table's apply action
c. The message prompter's okYesRetry event to the multi-row query's commitTransaction action
d. The message prompter's noAbort event to the result table's cancel action
e. The message prompter's noAbort event to the multi-row query's rollbackTransaction action
4. Now test the visual part by changing a value in the window and then closing the window.
Last modified date: 06/01/2018