Creating a query
Now that you have an active connection to a database, you are ready to create a query. Before you start, create a visual part for your application as follows:
1. From the basic Parts menu in the Organizer, select New.
2. In the Part class text field, type a name for your visual part.
For the sample application, type SampleDatabaseView.
3. Select OK.
The new part is added to the list of parts for your database application and the Composition Editor opens on the part.
Adding a Multi-row Query part
VA Smalltalk supports three separate query parts:
•The Multi-row Query part is used mainly for fetching large blocks of data. It executes SELECT statements only. You can set options for limiting the number of rows to be fetched by the query and the block size for returned rows. You can also set the update policy for the result table of a multi-row query.
•The Single-Row Query part is used to fetch a single row of data from a database.
•The SQL Statement part is used to construct UPDATE, DELETE, and INSERT statements.
This section explains how to use the Multi-row Query part. Refer to More database techniques for instructions for using the Single-Row Query and SQL Statement parts.
1. In the Composition Editor, select  , the Database Functions category, and
  , the Multi-row Query part.
 , the Database Functions category, and
  , the Multi-row Query part.
 2. Add the multi-row query part to an open space of the free-form surface.
This creates an empty query part, which does not yet do anything. To make the query do something useful, you need to change its settings.
Defining the settings
1. From the part's pop-up menu, select Open Settings, or just double-click on the part.
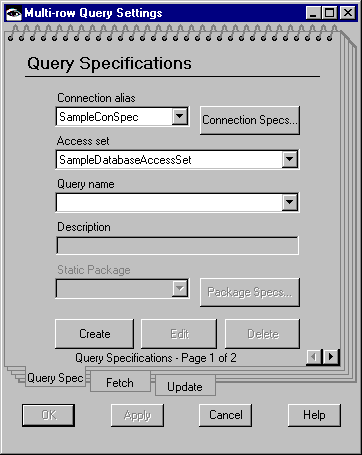
The Multi-row Query Settings window opens. You use this window to define or choose a SELECT statement to run, to set the fetch policy for the query, and to set the update policy for the result table.


2. From the Connection alias drop-down list, select a connection alias.
For the sample application, select SampleConSpec.

You can check the status of a connection specification by selecting the Connection Specs... push button. This button displays the Database connection specifications window. If the value in the Active? field is Yes, then you are connected to the database manager. If the value in this field is No, then you can connect to the database manager by selecting the connection specification, pressing mouse button 2 (or 3) to display the pop-up menu, and then selecting Connect.
3. From the Access set drop-down list, select an access set.
For the sample application, select SampleDatabaseAccessSet.

The connection aliases and access sets that appear in the drop-down lists on this window include those defined for the current application and its prerequisites.
You will use the remaining pages of the settings notebook later. For now, the next step is using the SELECT Details window to define a SELECT statement for this query.
Last modified date: 05/20/2020