Building the client application
In the Organizer window, create a new application named MyTCPSampleApp. Create a new visual part in this application named MyTCPSampleSocketView.
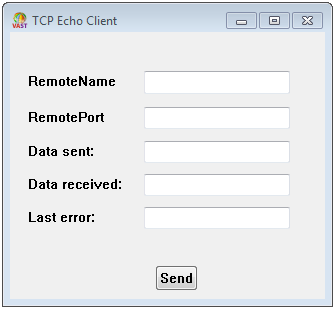
In the Composition Editor create a window that looks like the following, by using Text parts, Label parts, and Push Button parts:

To complete the client application do the following:
1. Open the settings of the Remote port Text part and under the converter attribute, change the Data type to Integer.
2. Place a TCP Socket part on the free-from surface.
3. Tear off the lastError attribute of the TCP Socket part and place it on the free-form surface.
4. Place a TCP/IP Connection Spec part on the free-form surface. Open its settings and make sure the code page is set to the code page used on the system where your server will be running.
5. Place a Buffer part on the free-form surface.
Making the connections
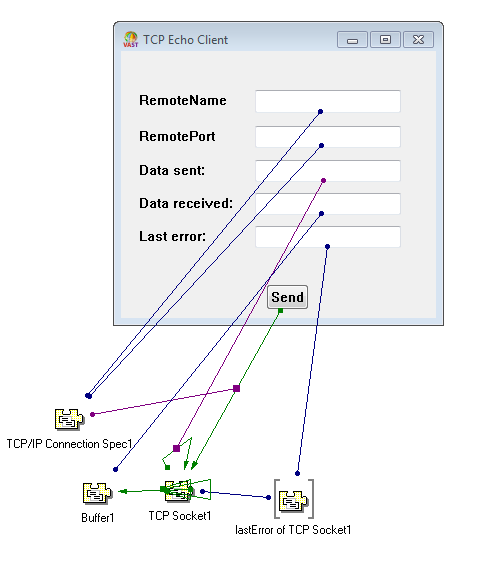
Connect the parts as follows:
1. Connect the codesAsString attribute of the lastError part to the object attribute of the Last error Text part. The Last error Text part will show any communication errors that occur.
2. Connect the object attribute of the Remote name Text part to the hostId attribute of the Connection Spec part. The Remote name Text part can now be used identify the server.
3. Connect the object attribute of the Remote port Text part to the port attribute of the Connection Spec part. The Remote port Text part now identifies the port.
4. Connect the clicked event of the Send push button to the connect action of the TCP Socket part.
5. Connect the self attribute of the Connection Spec part to the spec attribute of the connection you created in the previous step. This connection informs the Socket part of the specific server and port you wish to communicate with.
6. Connect the connected event of the TCP Socket part to the sendString action of the TCP Socket part. Now, when the connection to the server is established, a send will automatically occur.
7. Connect the object attribute of the Data sent Text part to the string attribute of the connection you created in the previous step. This connection identifies the data to send.
8. Connect the sent event of the TCP Socket part to the receive action of the TCP Socket part. Now, whenever the send is complete the client application will automatically wait until a response is received.
9. Connect the normalResult attribute of the connection you created in the previous step to the initializeWith action of the Buffer part. This sets the contents of the buffer to the response received from the server.
10. Connect the contentsAsString attribute of the Buffer part to the object attribute of the Data received Text part. This displays the response received from the server.
11. Connect the TCP Socket part's receiveCompleteData event to the TCP Socket part's disconnect action. This ends the connection to the server when all the response data has been received.
When you are finished making the connections, your part will look like this in the Composition Editor:

The client application is complete, so save the part and close the Composition Editor window.
Last modified date: 02/27/2018