VisualWorks users: rejoice! You can skip this discussion. Visual Smalltalk and VisualAge/IBM Smalltalk users: welcome to the border between Smalltalk and host resources. Traditionally in these latter two environments, if you use an object that allocates host resources of any kind, you must explicitly release those objects when you are done with them. If you don’t, the Smalltalk garbage collector will collect them when they are no longer referenced, but the resources will not be freed. The result is that your limited resources under your host windowing system will slowly degrade.
One way to do deal with the problem is simply to send the message release to each GO when it is no longer referenced and will be garbage-collected, typically before you close your window or when you delete a GO. Visual Smalltalk 3.x provides an easier way to get the same effect via finalization. If you send an object the message needsFinalization, the virtual machine will cause the object to receive a finalize message just before it is to be garbage collected; i.e., when nobody references it any longer.
In GF/ST under Visual Smalltalk and VisualAge/IBM Smalltalk, we have chosen to make use of finalization the default when you create new instances of GFGraphicObject. However, for finalization to work in Visual Smalltalk versions prior to 3.1 (it is included by default in 3.1), you must have the finalization “extra“ provided by Visual Smalltalk loaded into your image. If you don’t, GF/ST will still work without errors (since we handle the DoesNotUnderstand exception when we tell a GO it needsFinalization). However, you will then have to release GO’s manually. We highly recommend that you load the finalization extra when using GF/ST. Finalization is available in the \EXTRAS\FINALIZE subdirectory in the Visual Smalltalk 3.0 release.
We implement a default finalize in GFGraphicObject that says:
We can therefore be sure that every nodeGO will receive the message finalize, resulting in the release of host window system resources, when it is no longer held onto by anybody.
Warning: If you do not use finalization under Visual Smalltalk 3.0.x, you must explicitly release your GO’s that use bitmaps (GFImageGO, GFGroupGO, GFButtonGO, and any of the Visual Inspector object GO’s). In addition, you should either use an unbounded stack for undo’s (the default is 15) or turn the option off via noUndo. The reason is that the GFBoundedStack holds onto instances of GFMemento in order to undo deletion operations you might perform. If undo is enabled, you should not release GO’s when you delete them, because an undo might cause it to come back. And, since you can’t release it when you delete one, if the stack is bounded, it is possible that the GO will be garbage collected when the stack grows, without your having released it. If you use finalization, this problem goes away. If you do not use finalization for some reason, you may want to consider making an unbounded stack or “no undo” be the default.
You can create group and composite GO’s using the graphicObjects: method, supplying a collection of any GO’s as an argument. The following script illustrates the process. Also, refer to “Creating a GO in the Network Editor“ as an example of a simple GFGroupGO.
Locators are required when you use dependent GO’s. Dependent line type GO’s we supply include GFDependentLineGO and GFDependentOrthogonalPathGO. You may use locators if you specialize handle behavior, too. See the discussions in “GFLocator“ and “Specializing Handles in the Network Editor“. For another example of dependent line usage, see the PsiSolid class used in the 3-D Figures demo, discussed in “Dependent Lines“.
When you send the locator the message evaluate or asPoint, it will return the result of sending the message center to the polyline, aGO. Any message understood by the polyline is acceptable, as long as it returns a Point.
This last expression will locate the first point in the polyline. It would only be useful with polylines, because all GO’s do not understand point:. This particular locator would be used to specify the location of a handle at a particular point on a polyline.
There is a set of common protocol in GFGraphicObject to return points at specific locations in GO’s. Specific GO’s extend or override the protocol, as in the point: method of GFPolylineGO. Common protocol that all GO’s understand includes:
|
•
|
|
•
|
|
•
|
Note that dependent GO’s use the GFLocator to specify their start and stop locations. The locator is a simple way to forward a message to another object to obtain a point, and it is described in “GFLocator“ in “Basic Concepts and Classes“.
Assume that self returns a menu when sent ellipseMenu and rectMenu. You can attach these menus to the GO’s via the #getMenu event which is triggered by the GO when you click the right mouse button while the cursor is over the GO.
When you use GF/ST in an application, you will be using a GFDrawingPane, or its double-buffered equivalent GFOwnDCDrawingPane. Typically, though, you will not be sending messages to the GFDrawingPane itself, but to the GFDrawingInterface to which it is attached. The GFDrawingInterface is your main channel of communication to the GO’s as a group. One of the first jobs you need to perform when you create your application is to create an instance of a GFDrawingPane and connect it to an instance of a GFDrawingInterface. The script below shows one convenient way to accomplish the task. Refer to the open and createViews methods in the various applications and examples that come with GF/ST for other specific examples.
The drawingPane can be added as a subpane in the creation of a window. In practice, the GFDrawingInterface referred to above as interface will be needed again and should be put in an instance variable.
When using an interface builder like WindowBuilder Pro or PARTS, you should create and connect the GFDrawingInterface to the GFDrawingPane before the window opens. In these cases, you will not want to invade the createViews method which WindowBuilder Pro automatically creates for you. Instead, you should use the preInitWindow method in WindowBuilder Pro or the initializeParts method in PARTS to accomplish the task in these cases.
Assume you are using WindowBuilder Pro and that you have named the GFOwnDCDrawingPane ‘drawingPane’. You have also decided to keep the GFDrawingInterface in an instance variable called interface. Your preInitWindow method would look like this:
Assume you are using PARTS as an interface builder only. In that case, you would use the properties dialog to name the GFOwnDCDrawingPane #drawing. Your initializeParts method would look similar:
We expect that the default menu for a drawing will suit your purposes during development. The likelihood of it being correct for your end-users is approaching zero, however. It is very simple to reassign the menu via the #getMenu event. You will probably be holding onto the GFDrawingInterface in an instance variable. From it, you can reach the drawing itself, to hook into the #getMenu event:
In most cases, you would want to set the menu for the drawing before opening the window. As discussed in “Creating a GFDrawingPane to Add to a Window“, the appropriate spot would be in preInitWindow for WindowBuilder Pro or in initializeParts for PARTS.
To move a GO to the middle of the visible area on the screen without causing a redraw. The argument, aPoint, specifies the delta in the Smalltalk platform coordinate system.
To change the scale of a drawing, causing a redraw. The argument, aPercent, is 100 for 1:1 display.
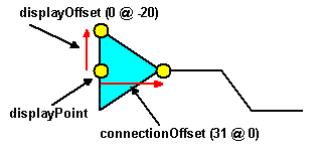
GFDirectedPathGO’s use the standard displayWith: message to display themselves and their end plugs (if the end plugs are not nil). In the above example, the result is (assuming self is aLineGO):
The end plug is passed as an argument so that aLineGO can let anEndPlug know what its displayPoint, displayOffset, and connectionOffset are.
You can specify what form the units take by using the various subclasses of GFLogicalUnit. The default unit specified is in pels (i.e., pixels on the screen). You can also specify either hundredths of millimeters, thousandths of inches, or twips, using the GFHundredthMillimeter, GFThousandthInch, or GFTwip classes. A twip is 1/1440th of an inch and is a common measurement used in print layout.
The GFCoordinateControl, used by the GFDrawing, holds onto the instance of GFLogicalUnit which is active. The GFLogicalUnit, in turn, holds onto a resolution value. In GF/ST, we use the GFThousandthInch logical unit defined by the class method defaultResolution. The defaultResolution method ends up setting the resolution to:
On one machine at 800x600 resolution, this expression results in resolution being set to 15.625@15.625. In other words, 0.015625 inches per pixel.
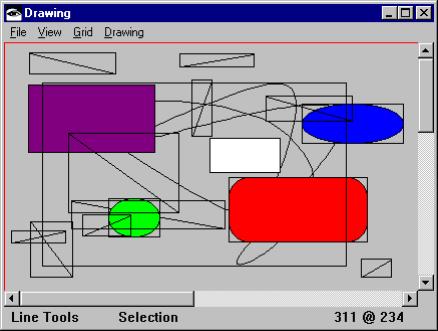
Typically, you should view the Quad Tree implementation in GF/ST as having “no use serviceable parts.” If you break it, very bad things can happen to your drawing. It is however, both interesting and informative to be able to view the Quad Tree layout in a complex drawing. To see it, send the message showQuad to the drawing interface. Probably the easiest way to accomplish this is to open an inspector on a graphic object and evaluate:
A side note: one of the key responsibilities of the damageDuring: method is to keep the quad tree in sync with the arrangement of GO’s as they change during the evaluation of the block argument. Refer to the discussion in the “GFGraphicObject“ section of “Basic Concepts and Classes“.
See the comments and code in GFMemento and GFBoundedStack for implementation. See the Drawing Editor and GFDrawingInterface for details of usage. For background on the memento approach, see Design Patterns by Gamma, Helm, Johnson, and Vlissides, an excellent reference for your library. Our Smalltalk implementation of the basic memento pattern discussed in the Gamma book extends it to make it more flexible and useful.
GFMemento is a generalized class for recording state information while trying to preserve encapsulation. It should only be created via one of the originator:state: methods, of which there are several variations.
A GFMemento preserves encapsulation by allowing access to its type and state information only if strict conditions are met. These conditions are always met if the originator of the memento is identically equal to (==) the requester object. The memento can also hold onto an accessKey. The accessKey is a symbol. When the requester object is not the same as the originator, the message specified by the accessKey is sent to the originator and the requester. If the results are equal (i.e., as determined by the = comparison), then the requester is allowed access to the memento’s type and state. A good example of an accessKey would be #class. If the accessKey is specified as #class, then any object of the same class as the originator can get access to the memento’s internals. If the accessKey is nil, then the requesting object must be == to the originator.
The default action is for a Symbol to be stored into the type field. The restoreUsing: method (implemented in Object) will perform the type symbol using the state information as the parameter.
The undo facility provided with GF/ST is not specific to GF/ST. You can use it in your own application. However, use of GFMemento requires design thought on your part. The type and state information of a memento must be supplied by your application - it does not come for free.
When you print, only the region that encompasses the GO’s in your drawing is printed at the scale you specify. Multi-page printing is handled automatically. You can print in landscape mode by selecting it in the standard print dialog. Since printing performance and abilities are tied very closely to drivers and hardware, please consult the README file for the most current information we have concerning any limitations on printing. Always be sure to use the most up-to-date printer drivers. If printing works properly on one machine or on one printer in your application, but not on another, you should suspect machine and/or driver setup, not GF/ST or your application. If you have problems printing drawings that contain bitmaps (including GFGroupGO’s), you should try using:
By setting the cacheFlag to false, GF/ST will not use a bitmap to cache the GO, and printing may be improved. In particular, problems may be cured for some PostScript printers that have difficulty printing opaque bitmaps.
Handles are extremely powerful and thus extremely parameterized. This design approach makes it possible for you to use handles in very different ways without creating new kinds of handles to get different behaviors.
Track handles are used to translate mouse movement into actions on a GO. Track handles hold a change selector to specify the message which will be sent to the GO, along with a Point that typically specifies how much the mouse moves. Track handles come in several flavors
The following code creates a handle on a GO, located at its center. The selector translateBy: is the change selector.
To use a method like offCenter: on the GO, which requires a Point as an argument to specify how much “off center” the handle will be, there is more elaborate protocol on GFTrackHandle:
GFTrackHandle
on: aGO
at: #offCenter:
with: 5@5
change: #translateBy:.
on: aGO
at: #offCenter:
with: 5@5
change: #translateBy:.
An more elaborate very useful approach is to use a sense selector to compute a point from the mouse movement delta, and pass that result as an argument to the change selector. The protocol is:
To take some action when a handle is invoked, you can handle the event #handleInvoked, which is triggered by the GFDrawingInterface.
Whenever a GO needs handles (i.e., whenever it is selected), it triggers the event #generateHandles. If you do not handle the event, you will get the default set of handles for the GO. The default handles will work fine for initial development of an application, but they are almost guaranteed to be inappropriate for your end application. To specify the handles that are appropriate for your application’s GO’s, write a method that returns a collection of handles:
Often, the state of an application determines what handles are appropriate. Also, since handles have so much behavior themselves, you may need to decide in your application logic what events handles will be handling, and what kinds of actions they will invoke. The typical way to deal with the problem is to write a handlesFor: method in your application. Then, when you create the GO, simply tell it:
A position handle is the handle that is created when a GO is to be moved. While position handles are primarily used to move a GO, you may find other uses for them in your application. For example, you may want to send some message to another object whenever you let go of a the GO you are positioning. In that case, you could create the GFPositionHandle in a positionHandleFor: method in your application, and specify the releaseAction for it when you create the handle:
Events are central to GF/ST architecture, so you’ll be using them a lot whether you know it or not. Refer to “The GF/ST Event Model“ for more information on the basics of events. If you want to know when or why an event is triggered, refer to “Events Explained“ in the “Class Hierarchy, Protocol, and Events“ section. In this section, we’ll try to anticipate some of the questions you might have about events when you start developing an application using GF/ST.
We’re all used to looking at senders and implementors to track how messages flow through Smalltalk. When you use events, an event may be triggered in a method whose name is different than the event name, and it may result in execution of a method that is different than the event name. Consider the case when you use the #getMenu event to be able to provide your own menu to your drawing.
If you look for implementors of getMenu, you will find that nobody implements it. When you look for senders of getMenu, you will find the methods that trigger the event. These methods are not sending the message getMenu, they are sending the message triggerEvent:, with #getMenu as the argument. Fortunately, “senders” locates all methods that use the symbol #getMenu.
If you look at senders of networkMenu , you’ll only find the method where you set up the dependency; i.e., the method that does the when:send:to:. Let’s take a look at the #getMenu event to see what’s really happening. We’ll use VisualWorks as our example, although you’ll see similar results elsewhere.
Examining senders of getMenu, we see the only interesting case is the menu method in GFGraphicObject:
Now, if you put a halt in your networkMenu method, this is the stack you’ll see:
Some of the above stack is VisualWorks specific, but it’s pretty close to what you’ll see in all versions. Looking at line 6, you can see that the menu method in GFDrawing (inherited from GFGraphicObject) ends up invoking the networkMenu method in GFNetworkEditor. It does this not by saying:
This means that if you look for senders of networkMenu, you will not find the menu method in GFGraphicObject. Instead, you must trace it via the when:send:to: and the method that triggers the event #getMenu.
In line 5, the triggerEvent:ifNotHandled: method, we determine that the instance of GFNetworkEditor is handling the event, and we evaluate the “Action” for it. This action was created when we originally sent the message when:send:to: to the instance of GFDrawing.
Remember from the discussion in “The GF/ST Event Model“ that there are two sides to events: first, registering a public interface as to what events may be triggered in a subclass of PsiEventModel, and second, triggering the event at the appropriate time.
To register a new event in a subclass of PsiEventModel, you must add it to the list which is returned from the class method eventsTriggered. For example, the eventsTriggered method in GFLineGO looks like this:
Note that the variable eventsTriggered is a class instance variable. Class instance variables are not class variables (which are visible to the class and all subclasses), they are instance variables for the class itself. Therefore, when we ask the class GFLineEndGO for its eventsTriggered, we will get a different set of events than we get for GFGraphicObject.
All eventsTriggered methods which we supply with GF/ST use a lazy initialization technique (so if eventsTriggered is nil, it initializes itself before returning). We also always inherit the events held in eventsTriggered in all superclasses.
When you want to add an event to the list in eventsTriggered in an existing class in GF/ST, you should first edit the class method eventsTriggered to add a new event symbol, and then reset the eventsTriggered instance variable for that class and all of its subclasses via:
If you do not send the message resetEventsTriggered, neither the class nor any of its subclasses will return the new event in their list (since they use the class instance variable, not a class variable). As a matter of fact, it is safest simply to evaluate:
Once you add in the symbol to the eventsTriggered and you reset the class instance variable, you can use triggerEvent: in a method of the class, and you can set up notifications to dependents using the when:send:to: protocol. It is possible to trigger an event which nobody cares about, and it happens all the time. However, when you send the message when:send:to: to an instance of a PsiEventModel subclass, we check to see if the event is in the list of eventsTriggered for the class. If it is not, you will receive an error:
Fix the problem by adding the event in, as discussed about, or by fixing the argument in when:send:to: to use a supported event.
