|
•
|
Demo Launcher - Used to launch the example applications. The launcher (actually, the class GFDemoLauncher) uses GFButtonGO’s to launch the applications.
|
|
•
|
About Dialog - The GFAboutDialog displays the propaganda information about the demo as well as the rotating tensegrity picture.
|
|
•
|
Drawing Editor - A kind of “catch all” application that lets you try out new GO’s you might create. You can access all the basic GO’s supplied with GF/ST from the floating palette. The Drawing Editor (actually the class GFDrawingView) shows the default behavior of all base GF/ST GO’s.
|
|
•
|
GFThreeDEditor - A good example of coupling underlying domain models (of 3-D figures in this case) with GO’s.
|
|
•
|
PsiVisualInspector - A new tool for your toolbox. We expect you’ll start using this inspector instead of the standard ones in Smalltalk, especially since you have them built into it, too.
|
These applications are all well-commented, and we expect you to browse through them to learn how they solve different user interface issued in GF/ST. We’ll be using them extensively in the “How To’s“ to refer to specific chunks of code.
For completeness, we’ll include a description of how to use each of the major demonstration applications. In them, we’ll explain the basics of what a GFHandle looks like, and so on. You may find it easier just to open them up and use them, and then refer back to the appropriate discussion in the manual when you need to. The exception to this approach is the Visual Inspector. There is a lot of functionality built into the Visual Inspector which you may discover by playing with it, but which might be easier to read about. For example, you can assign objects into instance variables using the connection handles, but it’s not obvious from looking at it. For details on using the Visual Inspector, refer to “Appendix A - The Visual Inspector“.
Probably the most important learning-by-example tool we provide for people starting out is the Network Editor. It is a simple application, it’s easy to understand what it’s doing, and it illustrates all the basic concepts you need to know to get up and going. It forms the basis of an entire chapter: “GF/ST Application Design & Decisionmaking“.
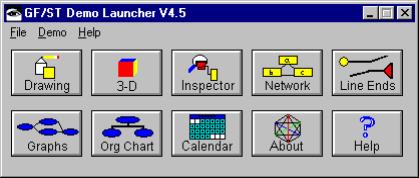
The three buttons on the upper left open the Drawing Editor, the 3D Figures Demo and the Visual Inspector respectively. The next few buttons open additional demos that may or may not exist in your environement depending upon what you have loaded. The last two buttons opens the About Dialog and Help file for GF/ST, or for the runtime demo if you are in runtime. On-line Help is only available under Windows.
In Visual Smalltalk, the GFDemoLauncher was built as a subclass of ViewManager. In VisualWorks it is a subclass of ApplicationModel, and in IBM Smalltalk it is a subclass of GFApplicationWindowES (a subclass of WbApplication). They all follow a generic approach for opening a GF/ST application, which is described in detail for the Network Editor (see “Creating and Opening the Network Editor U“). The specific methods for the GFDemoLauncher are:


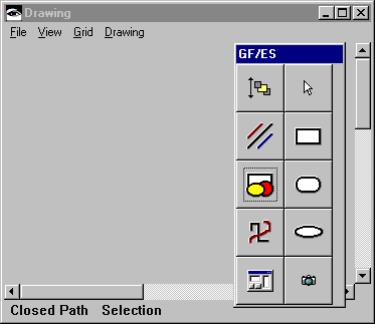
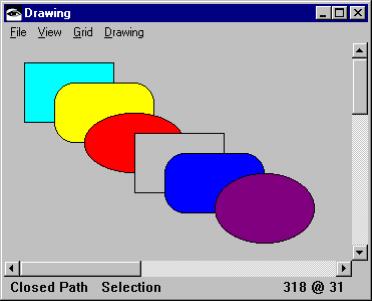
There is a main window to draw-in, labeled Drawing, and a floating palette window. The items on the left of the palette are used to choose the category of tool you are using.
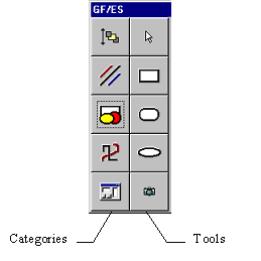
When you select an item on the left, the tools available in that category update. You always have a selection tool available at the top no matter what category you choose. Note that as you select categories and tools in the palette, the status pane at the bottom of the drawing window updates to let you know what’s going on.
The concept of a tool is central to GF/ST, as is the concept of handle. For an overview of the concepts, refer to “Basic Concepts and Classes“. For details of how you will be using tools and handles in your own application, you can start with the chapter on “GF/ST Application Design & Decisionmaking“. Right now, we’re trying to concentrate only on how the Drawing Editor behaves without getting hung up in too much detail.
Each graphic object on the screen can have its own specialized pop-up menu. You don’t have to select the object to bring up its menu. Just position the cursor over the object and click the right mouse button. Try some of the options to see how they work. Line graphical objects (or more generally, path figures) also have their own pop-up menus - you just have to aim well when you pop them up. Check out the different behavior of the various types of graphic objects. Where do these menus come from? They are either inherited, or you can simply use the standard getMenu event to get the menu from anyone you want. See the discussion in How To’s sections “Setting the Menu of a GO“ and “Setting the Menu of a Drawing“ for details of using and disabling menus in GF/ST.
Each graphic object can have its own specialized set of handles. To be technically accurate, graphic objects do not know what handles they have - they simply trigger the event #generateHandles, and any object can return the appropriate handles. The Drawing Editor demonstrates the default handles which are provided when the event is not handled.
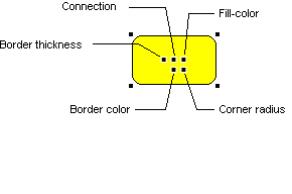
You can use the corner handles to resize a GO. When you select the border width handle, the pixel width of the border is adjusted as you move the mouse vertically. The corner radius handle adjusts the sharpness of the rounded corners. You can connect two graphic objects using the connection handle. Connections are a particularly difficult aspect to deal with generally in a graphical application. When you connect two objects, you’ll find that the line connecting them is another graphical object that is constrained to move with the objects it connects - a GFDependentLineGO. The connecting line has its own pop-up menu, letting you change it from a line to an arrow, or to an orthogonal path. Any, all, or none of these handles may be useful to your application, so we provide powerful ways to choose, display, and otherwise manipulate handles. See the discussion in “Specializing Handles in the Network Editor“ and the “How To’s” for more details.
You can select more than one graphic object by holding down the shift key as you select them. Alternatively, you can “rubber-band“ around multiple objects when are using the selection tool. Once you have more than one object selected, you can create a group or a composite using the “group” or “compose” menu options. Grouped objects can only be manipulated as a whole, while composite objects are positionable within the composition area on the screen, and can be moved as a whole. Try them out. It’s easier to see the difference when you play with them.
Groups and composites are one of the most powerful tools in GF/ST, since they let you compose arbitrarily complex graphic objects from very basic ones. See “Creating a GO in the Network Editor“ for a discussion of using groups and for guidance in how to decide between groups and composites.
The undo operation in GF/ST is very powerful. We use a “memento“ approach, and it is generalized for use in any of your applications, with or without GF/ST. Give it a test by undoing up to fifteen things you’ve done. We chose to limit the size of the bounded stack tracking undo-able actions to fifteen in the Drawing Editor, but you can set it to be unlimited or to any size you want. See the comments in GFBoundedStack for more information on the undo stack itself.
Undo is difficult to achieve in Smalltalk without violating encapsulation - how do you undo an operation on some object or an operation done by an object on itself, without having access to protocol or state you should not know about? The approach in GF/ST uses the “memento” pattern discussed in “Mementos“ in “Miscellaneous Topics“ of “Visual SmalltalkWarning: If you do not use finalization under Visual Smalltalk 3.0.x, you must explicitly release your GO’s that use bitmaps (GFImageGO, GFGroupGO, GFButtonGO, and any of the Visual Inspector object GO’s). In addition, you should either use an unbounded stack for undo’s (the default is 15) or turn the option off via noUndo. The reason is that the GFBoundedStack holds onto instances of GFMemento in order to undo deletion operations you might perform. If undo is enabled, you should not release GO’s when you delete them, because an undo might cause it to come back. And, since you can’t release it when you delete one, if the stack is bounded, it is possible that the GO will be garbage collected when the stack grows, without your having released it. If you use finalization, this problem goes away. If you do not use finalization for some reason, you may want to consider making an unbounded stack or “no undo” be the default.Mostly GFGraphicObject-Related How To’s
Warning: If you do not use finalization under Visual Smalltalk 3.0.x, you must explicitly release your GO’s that use bitmaps (GFImageGO, GFGroupGO, GFButtonGO, and any of the Visual Inspector object GO’s). In addition, you should either use an unbounded stack for undo’s (the default is 15) or turn the option off via noUndo. The reason is that the GFBoundedStack holds onto instances of GFMemento in order to undo deletion operations you might perform. If undo is enabled, you should not release GO’s when you delete them, because an undo might cause it to come back. And, since you can’t release it when you delete one, if the stack is bounded, it is possible that the GO will be garbage collected when the stack grows, without your having released it. If you use finalization, this problem goes away. If you do not use finalization for some reason, you may want to consider making an unbounded stack or “no undo” be the default.
True host components always show up on the top of a drawing because the underlying window system doesn’t understand how to deal with the non-host components like rounded rectangles. They also don’t display quite as smoothly when you manipulate them as the other components because the host windowing system that is drawing them isn’t as good at it as we are. Specifically, we use a double-buffering technique in GF/ST, as discussed in the “GFDrawingPane“ section of “Basic Concepts and Classes“.
Under Visual Smalltalk and VisualAge, the GF/ST host components are real Windows components. Under VisualWorks, they are true VisualWorks widgets. In the Drawing Editor, we’ve elected to make them active as soon as you unselect them, or select something else on the screen. In other words, if you draw a button on the screen, click on something else, and then click back on the button, it behaves just like a real button, since it is a real button. The consequence of this choice is that you need to use rubber-banding to re-select a host component once you’ve drawn it. If you were developing an application for building user interfaces, you would probably want to be able to switch between a building mode and a test mode to avoid confusion.
See any flashing as you manipulate graphical objects? We’ve spent a lot of time optimizing display performance. Also see the discussion in the “GFDrawingPane“ section of “Basic Concepts and Classes“ for more details.
Notice major any degradation of performance as you add tons of graphic objects? We use a GFQuadTreeElement approach to be able to handle large numbers of objects. Most drawing programs use outlines as you manipulate objects on the screen. The problem with outlines is that you cannot really see how your object will look when you get done modifying it. In addition, the performance of many drawing packages will degrade rapidly as complexity increases. The reason for this degredation is apparent when you consider what goes on as you drag an object across a complicated display of other objects, maintaining knowledge of z-ordering. Even if your application ignores z-ordering, you still need to determine what objects on the screen are affected by your changes to another object. Conceptually, it is not hard to do, but in practice, simple approaches make dragging, selecting, and scrolling become your biggest performance bottleneck. GF/ST’s quad-tree approach manages the spatial complexity to maximize performance. See the discussion in “Quad Trees“ in “Miscellaneous Topics“ of “Visual SmalltalkWarning: If you do not use finalization under Visual Smalltalk 3.0.x, you must explicitly release your GO’s that use bitmaps (GFImageGO, GFGroupGO, GFButtonGO, and any of the Visual Inspector object GO’s). In addition, you should either use an unbounded stack for undo’s (the default is 15) or turn the option off via noUndo. The reason is that the GFBoundedStack holds onto instances of GFMemento in order to undo deletion operations you might perform. If undo is enabled, you should not release GO’s when you delete them, because an undo might cause it to come back. And, since you can’t release it when you delete one, if the stack is bounded, it is possible that the GO will be garbage collected when the stack grows, without your having released it. If you use finalization, this problem goes away. If you do not use finalization for some reason, you may want to consider making an unbounded stack or “no undo” be the default.Mostly GFGraphicObject-Related How To’s
Warning: If you do not use finalization under Visual Smalltalk 3.0.x, you must explicitly release your GO’s that use bitmaps (GFImageGO, GFGroupGO, GFButtonGO, and any of the Visual Inspector object GO’s). In addition, you should either use an unbounded stack for undo’s (the default is 15) or turn the option off via noUndo. The reason is that the GFBoundedStack holds onto instances of GFMemento in order to undo deletion operations you might perform. If undo is enabled, you should not release GO’s when you delete them, because an undo might cause it to come back. And, since you can’t release it when you delete one, if the stack is bounded, it is possible that the GO will be garbage collected when the stack grows, without your having released it. If you use finalization, this problem goes away. If you do not use finalization for some reason, you may want to consider making an unbounded stack or “no undo” be the default.
By looking through the class GFDrawingView, you can gain some appreciation of what we mean by our earlier statement that the Drawing Editor simply shows the default behavior of graphic objects. The GFDrawingView class does almost nothing. It is comparable in complexity to the GFFloatingPaletteWindow you use to select tools from the various categories. All the work is done by the underlying GF/ST framework classes you were introduced to in “Basic Concepts and Classes“.
You do not need to (and are hereby actively discouraged from doing so) maintain direct references between the objects taking part in this interesting dance, since we use an event model to communicate between them. See the discussion in “What You Absolutely Must Know to Use GF/ST“ for background on the event model and a contrast with the Model-View-Controller approach. We believe that GF/ST takes the good parts of both MVC (loose coupling and factoring) and a modern event-driven approaches.
Select a rectangle in the Drawing Editor. The handles on the four corners transport information about the position of the corners of the rectangle. When you drag one of these handles, it sends the growBy: message to the graphical object. When you hold down the left mouse button in a graphical object and you are not on a handle, a GFSelectionTrackHandle is created dynamically that transports information about the changes in position to the graphical object.
You can see that handles provide the central interface for input from the user in a GF/ST application. They take input from the user and route it to the appropriate object. Since handles play such a key role, you’ll need a powerful way to define and control what handles show up, what they do, and what they look like. Refer to the discussion in “Specializing Handles in the Network Editor“ for detailed discussion of various handle protocols, as well as the “How To’s”. The 3-D Figures demonstration shows some even more interesting variations on handles which we will be discussing in that section.


In the GFThreeDEditor, we use a GFParameterizedTrackHandle. We use the #generateHandles event (see “Adding a GO for a Network Node“), and when the figure needs handles, we create them on-the-fly. For example, from the GFThreeDEditor>>handlesForFigureIndex: method, here is what the “Z” handle looks like:
When you grab the “Z” handle and move it, the handle sends the message changeZ: delta: to the GFThreeDEditor. The first argument is the index of the GO tracked by the GFThreeDEditor, i, and the second argument is a point that is the change in mouse position. In its changeZ:delta: method, the GFThreeDEditor then tells the underlying domain model to change its Z dimension.
From the GFThreeDEditor>>addPsiSolidAt: method, the dependent lines are created as follows:
The lines variable is a collection of the GFDependentLineGO’s that is created at the beginning of the method and added to the GFCompositeGO at the end. The instance variable gos is a collection of collections, one for each of the GFCompositeGO’s in the drawing. For efficiency of display and manipulation of 3-D objects in a 2-D world, each of the secondary collections tracks the individual GO’s in the composite as well as the composite itself. (It’s just a caching trick to eke some more speed out of the demo, since determining face order in a rotating 3-D object is computationally intensive).
Note the use of GFLocator’s to define the position of the start and stop location of the dependent line. See the discussion in “GFLocator“ of “Basic Concepts and Classes“ for an overview of how locators work.
Notice that the pop-up menu for a cube is different than the menu for a tensegrity. Actually, the Faces submenu is different, because we want the faces of the tensegrity to remain transparent. You can specialize menus very easily because we use the event system to get the menu for an individual graphic object. The application itself can define the menu to be used for each graphic object if the default menu is not wanted. The application is also able to define what, if any, menu should be used for the overall drawing, when you pop-up a menu outside of a figure.
In the GFThreeDEditor, each 3-D figure on the screen is a GFCompositeGO. The composite is made up of filled polylines (GFPolylineGO’s), one for each face of the figure, and each of the polylines has its own menu. In the GFThreeDEditor>>addFigure: method, you can see how the menu for the polyline (referred to as aGO) is hooked into the GFThreeDEditor itself:
aGO when: #getMenu
send: #menuForFigureIndex:
to: self
with: (Array with: aGO with: (gos size + 1)).
send: #menuForFigureIndex:
to: self
with: (Array with: aGO with: (gos size + 1)).
When you click on the right mouse button while the mouse is positioned over a face of the 3-D figure, GF/ST triggers the #getMenu event. The GFThreeDEditor is in turn sent the message #menuForFigureIndex:, the argument for which is an Array with two elements (the first being the polyline GO, and the 2nd being the composite). The menuForFigureIndex: then returns the appropriate application-specific menu.

The GFAboutDialog>>open method shows one way to couple the GFOwnDCDrawingPane with the GFDrawingInterface in a window that also has standard subpanes. Refer to that method directly, and see the discussion in “Creating the GFNetworkNode GOCreating and Opening the Network Editor U“ for detailed discussion of similar issues in the Network Editor example.

You can invoke the Visual Inspector from the GF/ST launcher. The Visual Inspector is a tool that shows the state of objects and the relationships between objects graphically. It is a complex enough tool to warrant a separate chapter in this document (see “Appendix A - The Visual Inspector“). Non-source versions of the Visual Inspector are supplied as a freeware on some platforms, which is another reason that we’ve broken out the how-to-use-it documentation from the how-to-understand-it documentation.
To open a Visual Inspector on an object, send it the message psiVisualInspect. For example:
To flesh out the hierarchy, we initially created three subclasses of PsiAbstractObjectGO - PsiObjectGO, PsiVariableObjectGO (a subclass of PsiObjectGO), and PsiVariableByteObjectGO. These classes were needed to provide different behavior for the three flavors of objects available in Smalltalk. To deal with primitive objects, such as nil, Integer, true, false, and Symbol, we also created a subclass of GFTextGO, PsiPrimitiveObjectGO. To round it all off, we added two more classes under PsiObjectGO - PsiOrderedCollectionGO, and PsiDictionaryGO. Since the base image development environment provides these specialized inspectors, we decided their usefulness would extend into the Visual Inspector as well.
Besides being a useful tool for your development, the Visual Inspector is different than the other example applications provided with GF/ST, since it extends the framework. It adds in new GO subclasses and a new handle class. We encourage you to extend the GF/ST framework, and we caution you that, often, your problem can be solved by combining existing GO’s and making use of the events and parameterization that are already present. Refer to “GF/ST Application Design & Decisionmaking“ for more discussion and help in making these kinds of decisions in your own application.
